USER GUIDE
This guide provides instructions for installation, help on
getting started and extensive documentation of features.
Getting Started
To install this theme you must have a working version of WordPress already installed.
If you need help installing WordPress, below are all the useful links for WordPress information.
System Requirements
You should check that your hosting environment meets our minimum requirements. These are:
- PHP version 5.6 or greater (PHP 7.0 is preferred)
- WordPress version 4.5 or greater
- Wyde Core plugin version 2.6 or greater
- WPBakery Page Builder plugin version 5.1 or greater
You should also check WordPress System Requirements
Installation
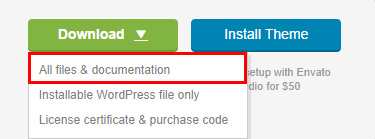
First, download the Aoraki files from your ThemeForest account. Navigate to your Downloads tab on ThemeForest and find "Aoraki - Multi-Concept WordPress Theme". Click the download button to see the download options.
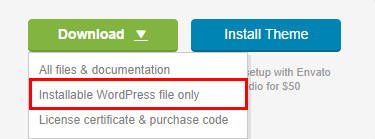
Alternatively you can simply download the installable WordPress file.
Package Content
If you download "All files & documentation", you will receive the main package zip file.
Zip package contains the following files and folders:
1. WordPress Theme
2. Demo Content
- Demo Content\aoraki-demo-content.zip
- Demo Content\How to Install.txt
3. Documentation
4. Plugins
-
Slider Revolution
Plugins\Slider Revolution\rev_slider.zip
Plugins\Slider Revolution\Docs\index.html
-
WPBakery Page Builder
Plugins\WPBakery Page Builder\js_composer.zip
Plugins\WPBakery Page Builder\Docs\index.html
-
Wyde Core
Plugins\Wyde Core\wyde-core.zip
Theme Installation
You can install the theme in 3 ways as follows:
Install via WordPress
- Navigate to Appearance > Themes.
-
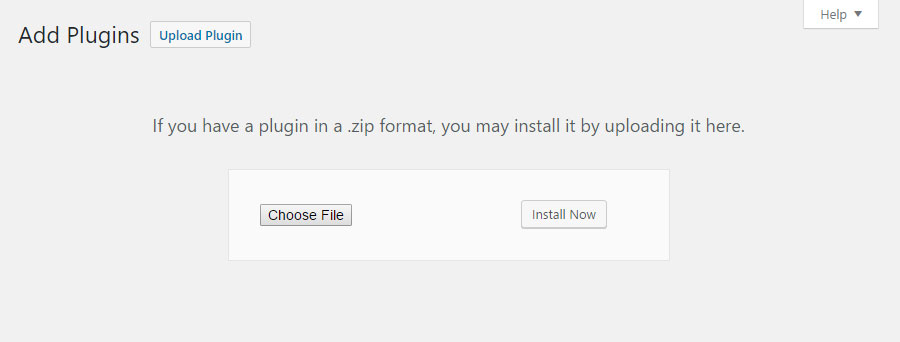
Click "Add New" button and hit the "Upload Theme" button.

-
Click on "Choose File" and find the “aoraki.zip” file on your computer and click “Install Now” button.
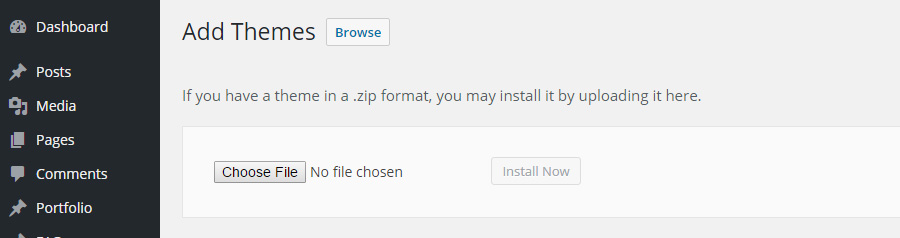
- The theme will be uploaded and installed.
- And then activate it.
Install via cPanel
- In cPanel File Manager, navigate to "/wp-content/themes/". If your WordPress is installed in the document root folder of your web server you would navigate to "public_html/wp-content/themes/".
- Click on Upload button to upload aoraki.zip from "WordPress Theme\aoraki.zip", see Package Content.
- Once the file is uploaded, select this file. Then click on Extract button to extract it.
- Go to Appearance > Themes on your WordPress admin page to activate it.
Install via FTP
- Unzip the aoraki.zip file and only use the extracted aoraki theme folder.
- Upload the extracted aoraki theme folder into "/wp-content/themes/" folder.
- Go to Appearance > Themes on your WordPress admin page to activate it.
Plug-ins Installation
After the theme activation, you will see a notification message to install the bundled and recommended plugins.

- Wyde Core
- WPBakery Page Builder
- Slider Revolution
- Contact Form 7
To install Bundled Plugins
1. All bundled plugins are included in the theme package, you can click on Begin installing plugins to show the bundled plugins list.
2. Select all plugins and install them.
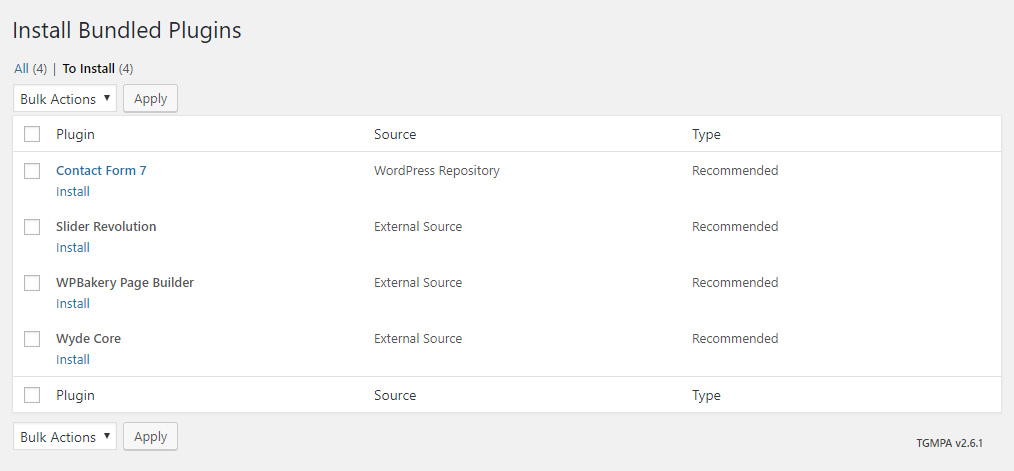
3. Then activate the plugins with Bulk Actions.
However, if the installation couldn't be completed, you may need to install them manually. See the instructions below.
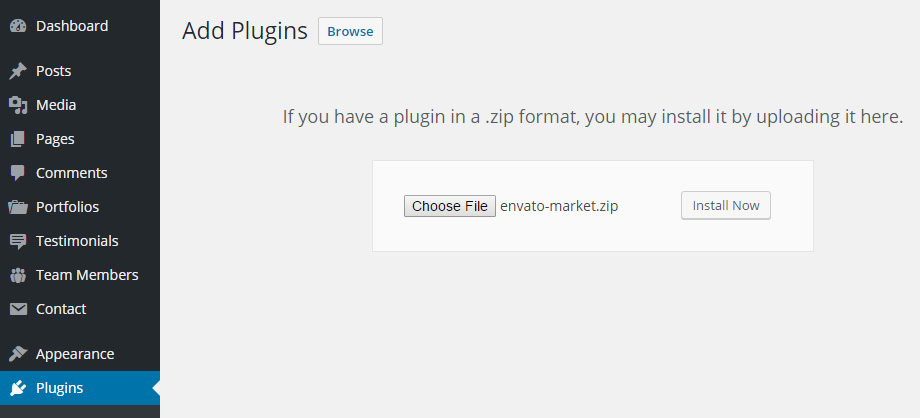
Manual Plugin Installation
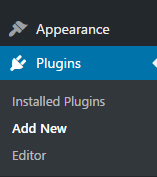
1. Go to Plugins > Add New.
2. Click Upload Plugin, and then choose the plugin zip file from the folder Plugins, see Package Content
3. Click Install Now to install the plugin.
You can find more details on how to install plugin manually here: Manual Plugin Installation by Uploading a Zip Archive
Update
You can update your theme by downloading a fresh copy from ThemeForest, deleting
the current version you have on your server and uploading the new.
Automatic Update
Using Envato Market Plugin
The Envato Market plugin can install WordPress themes and plugins purchased from ThemeForest & CodeCanyon by connecting with the Envato Market API using a secure OAuth personal token. Once your themes & plugins are installed WordPress will periodically check for updates, so keeping your items up to date is as simple as a few clicks.
Download and Install
Unlike most other free WordPress plugins, this plugin isn’t available in the WordPress Plugin Repository. You’ll need to go to Envato Market Github page to download the Envato Market Plugin zip file.
You can install the Envato WordPress Toolkit just like any other plugin. Navigate to the plugins section. Click Add New, then click on Upload Plugin. Browse for the plugin zip file (envato-market.zip) you downloaded from Github. Click Install Now, then Activate the plugin.
Setting Up The Envato Market Plugin
-
Navigate to the Envato Market menu.

-
Click on "generate a personal token" link to generate a Global OAuth Personal Token as follows:
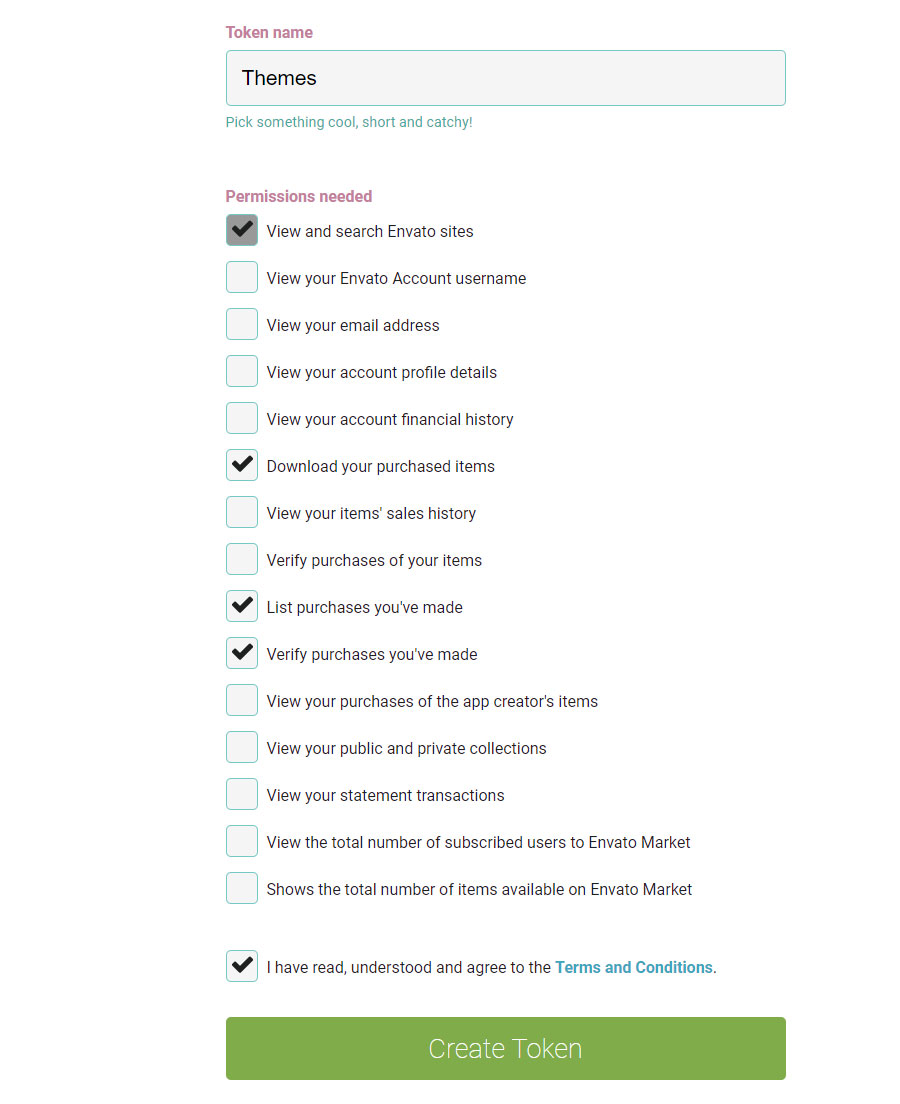
Click the Create Token button to generate your API key.
-
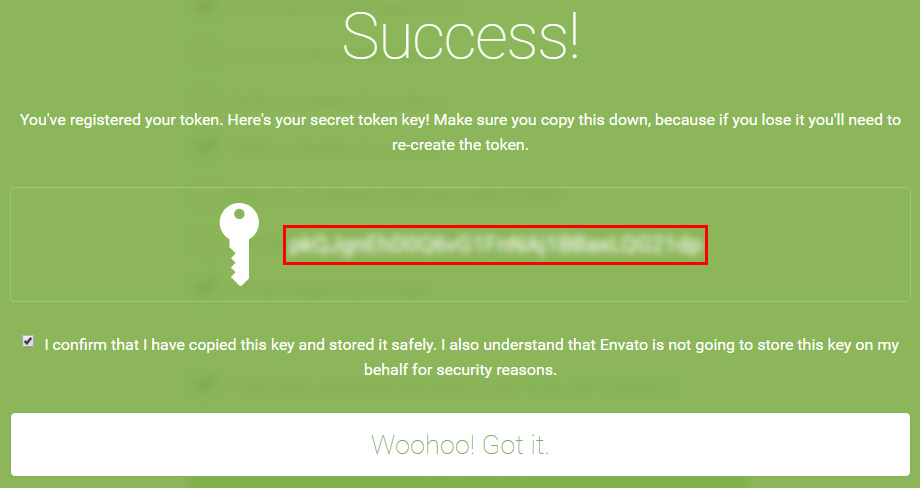
Copy that key, go to your Envato Market Settings page and enter the key into the Token field, then click on Save Changes.
-
Once you have your list of purchased themes displayed in the Themes tab. When there is an update available for the theme, you will see a link to update it.
- Lastly, update the included plugins. See Update the plugins.
Manual Update
Update via cPanel
-
In cPanel File Manager, navigate to "/wp-content/themes". If your WordPress is installed in the document root folder of your web server you would navigate to "public_html/wp-content/themes".
-
Click on Upload button to upload aoraki.zip from "WordPress Theme\aoraki.zip" in the main download package, see Package Content.
-
Once the aoraki.zip file is uploaded, click on this file, then click on Extract button to extract it to replace the old "aoraki" folder. You can delete the old "aoraki" folder before extracting the zip file if you'd like.
-
Lastly, go to your WordPress admin page to update the bundled plugins. See Update the plugins.
Update via FTP
-
Go to "/wp-content/themes" location and backup your “aoraki” theme folder by saving it to your computer, or you can choose to simply delete it. Your content will not be lost.
-
Download a fresh copy from ThemeForest, Unzip the "aoraki.zip" file.
-
Upload the extracted "aoraki" theme folder into "/wp-content/themes/" in your wordpress installation.
-
Lastly, go to your WordPress admin page to update the bundled plugins. See Update the plugins.
Update via WordPress
-
You need to deactivate the current “Aoraki” theme in the “Appearance > Themes” section by simply activating a different theme. Once you activate a different theme, you can delete the Aoraki theme. Don't worry, your content will not be lost.
-
Then simply upload the “aoraki.zip” file in the “Appearance > Themes” section. Once it finishes uploading, choose to activate the theme.
-
Lastly, update the included plugins. See Update the plugins.
Update Bundled Plugins
After you update the theme, if there is an update available for the bundled plugins, you will see a notification message letting you know the plugins have a new version and need to be updated. If the notification message was dismissed, navigate to Appearance > Install Plugins to see the bundled plugins list.

Click on Begin updating plugins, you will see the bundled plugins list.

Select all plugins, choose Update action and click on Apply to update all plugins.
Import Demo Content
Our importer will give you pages, posts, portfolios, sliders, widgets, theme settings, assigned pages and more. This is recommended to do on fresh installs. It will not replace content but append posts, pages, portfolios and sliders. It will replace theme settings, reading settings and widget settings.
Importing demo content requires "Aoraki Demo Content" plugin, please make sure you've installed and activated it.
Also, importing all contents can take a few minutes to complete the process. Please make sure you've set the PHP configuration limits to the minimum as follows:
- max_execution_time = 300
- memory_limit = 128M
- post_max_size = 32M
- upload_max_filesize = 32M
- max_input_vars = 5000
To install Aoraki Demo Content plugin
- Navigate to Plugins on your WordPress admin page.
-
Click on "Add New".
-
Click on "Upload Plugin".

-
Choose "aoraki-demo-content.zip" form your Demo Content folder (see Package Content), then click on "Install Now".
- Click on "Activate Plugin" to activate it.
To import the demo content, please see the below steps.
- Install and activate these plugins before you proceed: Wyde Core, WPBakery Page Builder, Slider Revolution and Aoraki Demo Content.
-
Navigate to Theme Options > Home, select the content types to import.
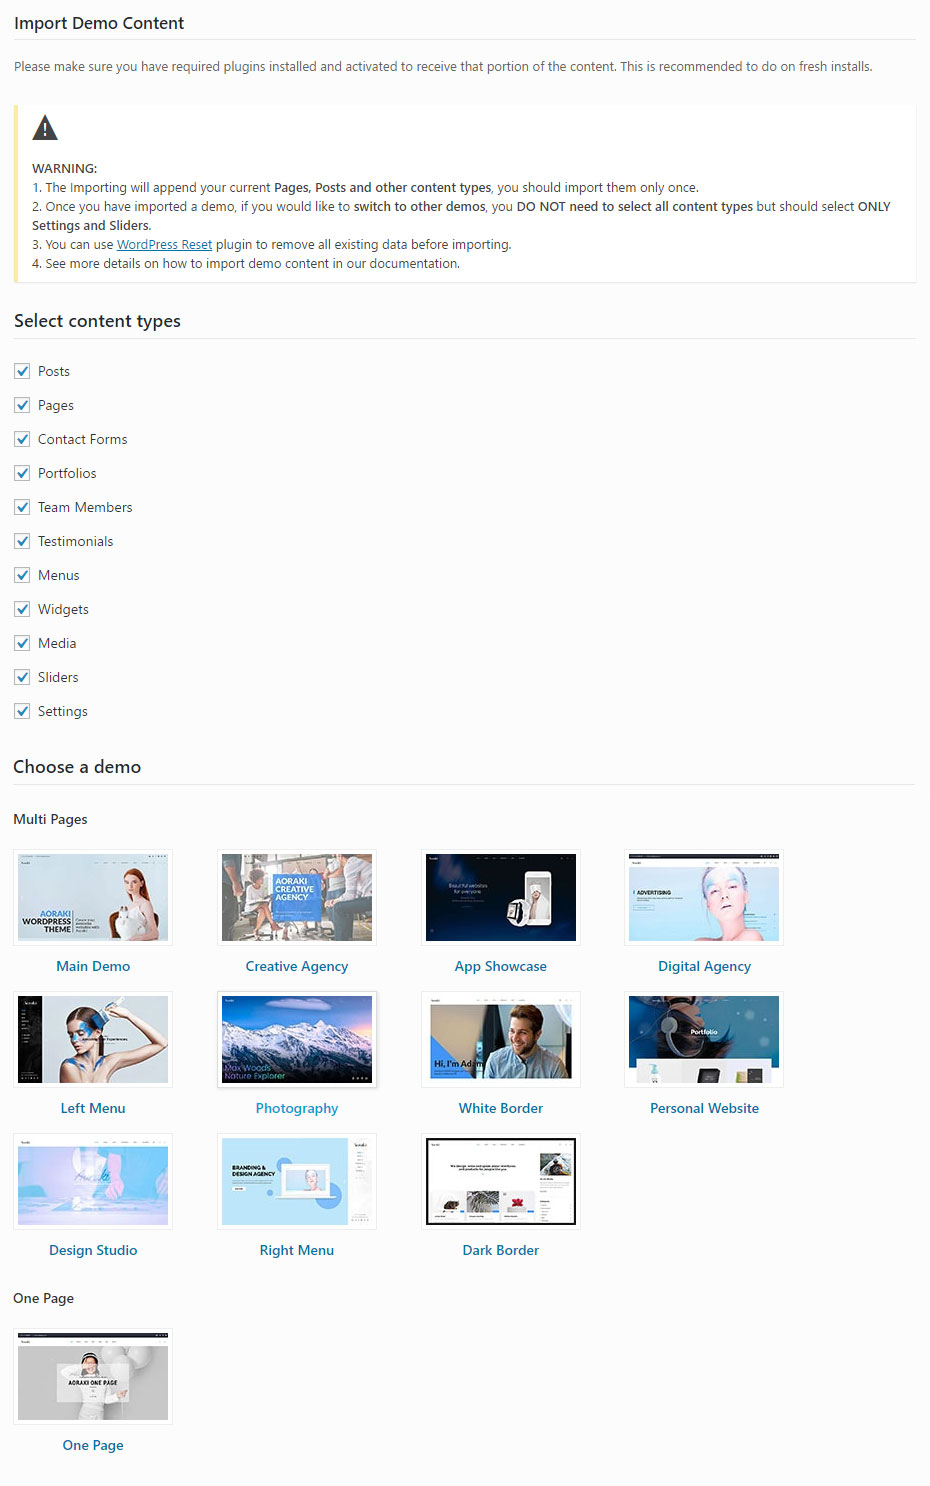
- Click on a demo icon to import.
- It can take several minutes to import everything. Please be patient and wait for it to complete.
Please Note:
All demos in Multi Pages section have the same pages/posts and other content types, the Sliders and Settings are only 2 different things. So once you have imported a Multi Pages demo, if you would like to switch to other Multi Pages demos, you DO NOT need to select other content types but should select ONLY Sliders and Settings to import.
Troubleshooting
Demo Import Fails
If it keeps getting stuck while importing or get an error icon and other similar issues, they are all related to low PHP configuration limits.
You can do this on your own by editing the file php.ini on your host, or contact your web host and ask them to increase those limits to the minimum as follows:
max_execution_time = 300
memory_limit = 128M
post_max_size = 32M
upload_max_filesize = 32M
max_input_vars = 5000
However, this depends on your server performance and resource usage limits on your hosting plan. If it still doesn't work, try to import them one by one.
To import demo content one by one
- Select only Posts option.
- Click on a demo thumbnail to start importing.
- Once the process has been completed, do the same thing for Pages and other options one by one.
Demo Content Duplicated
There are two ways to get rid of duplicate content.
-
WP Reset Plugin – This plugin is the fastest way to get rid of content. It will remove all content from your database and leave the default theme activated. Only do this if you are able to start over. Click Here To Download.
-
Manual Removal – This method will take longer and simply involves manual removing of duplicate items. For example, go to the pages and delete items. Same thing for posts, portfolio, sliders, etc.
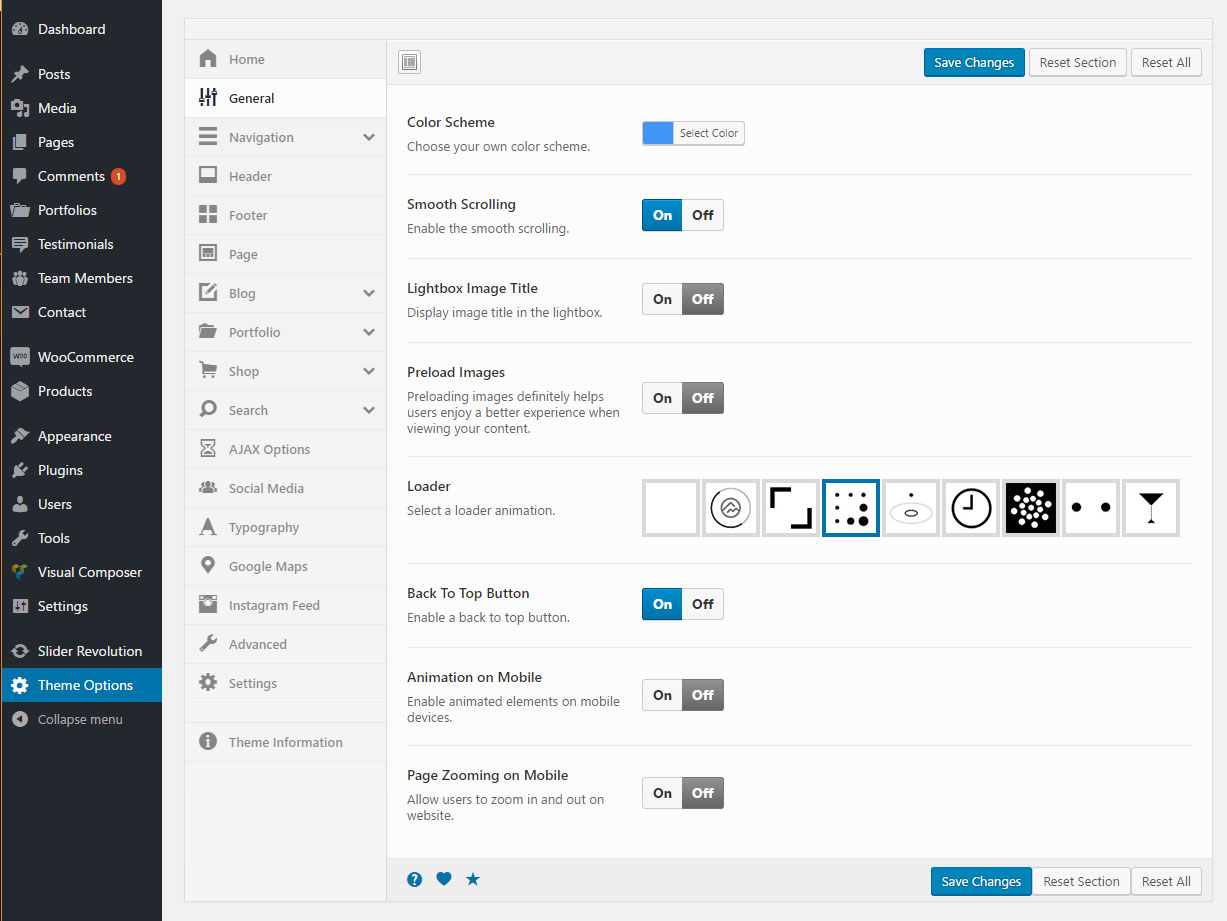
Theme Options
Please note: Some options are not available in WordPress Customizer and may not work when you customize on the live preview, you will need to do on the Theme Options panel instead.
Aoraki comes with a User Friendly Theme Options panel. Each option has a description of what it will do on the front-end.
Go to "Theme Options" on your WordPress admin to access the Theme Options panel.
Setting up the Google Maps
Since June 22, 2016 (see Standard Plan Updates) Google Maps no longer support keyless access from all new domains created on or after June 22, 2016.
You can get a Google Maps API key on: Get an API key, click on the GET A KEY button on that page.
Enable Google Fonts Auto Update
You can enable the automatic update for the Google Fonts in the Typography options by setting up the Google API key as below.
- Please make sure you have installed and activated Child Theme, see Child Theme.
- Add custom filter below to Theme Functions (functions.php):
                    function aoraki_get_google_fonts_api_key( $key = '' ){
                        $key = 'YOUR_GOOGLE_API_KEY';
                        return $key;
                    }
                    add_filter( 'aoraki_google_fonts_api_key', 'aoraki_get_google_fonts_api_key' );
To Get a Google Fonts API Key:
- Go to the Google API Console. And then login with your Google account.
- Create or select a project.
- On the Credentials page, get an API key.
Note: If you would like to set the API key restrictions. Please select the "IP addresses (web servers, cron jobs, etc.)" option, and then put your server IP Address in the field. The "HTTP referrers (web sites)" option will not work with the Google Fonts Auto Update feature.
- On the Library page, enable: Web Fonts Developer API
Import and Export Settings
You can export and import your settings in the Settings tab. That is a great way to move your custom settings from site to site.
Primary Navigation
Menu Locations
Primary Navigation – the main menu in the header area and side menu.
Footer Navigation – the menu that can be assigned to the footer menu.
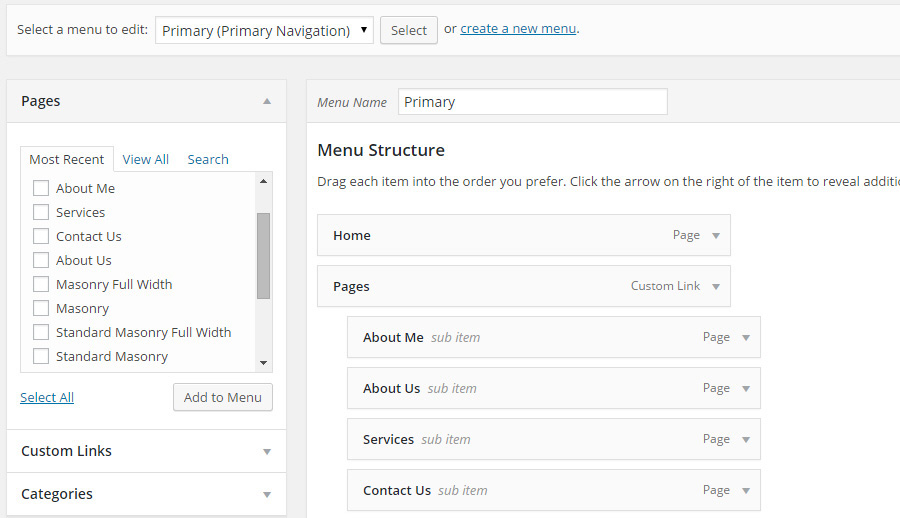
To Setup A New Menu, Follow The Steps Below
-
Navigate to Appearance > Menus section of your admin.
-
Click the “Create A New Menu” link to make a new menu. Enter the name then hit the “Create Menu” button.
-
To add a menu item, select one of your created pages on the left hand side and click “Add to Menu”. You can also add all kinds of different posts from the left side.
-
To add a custom menu item, enter a custom name and link into the “Links” box.
-
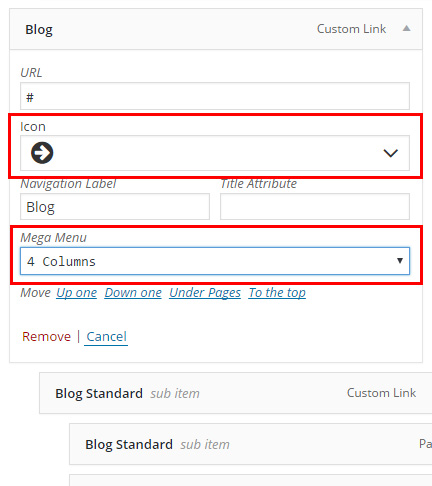
Manage your menus by using the drag and drop functionality. To create a dropdown menu, simply drag a menu item below and slightly to the right of another menu item and it will lock into place and create a dropdown section.
-
Choose an icon to add menu icon, and choose a number of columns for the Mega Menu to create Mega Menu.
-
After setting up your menu, scroll down to the bottom of the page to assign the menu location in the Menu Settings -> Theme Locations.
-
Once its all done, make sure you click the “Save” button.
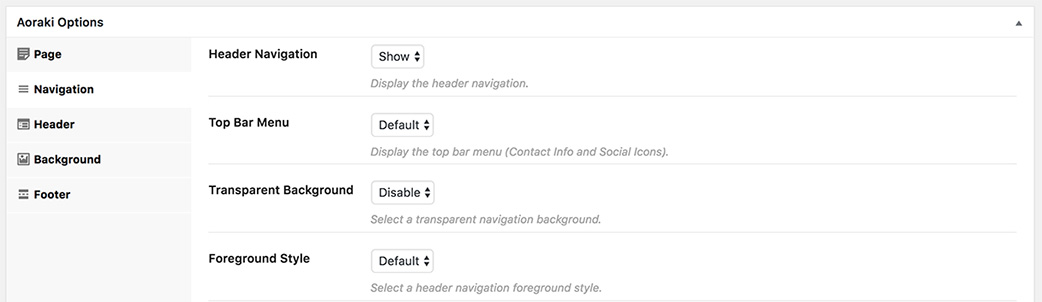
Navigation Layout
-
Navigate to Theme Options > Navigation
-
Choose a navigation layout, you will see additional options for each layout at the bottom of the page.
-
Select any options to customize the navigation styles.
- Edit the page with Back-end Editor.
-
In the Aoraki Options box, select the Header tab.
- Change the Transparent Header option to Enable.
You can choose the header text style for each page. This option can also change the header logo style as well as the menu text style.
- Edit the page with Back-end Editor.
-
In the Aoraki Options box, select the Header tab.
- Choose Dark or Light or choose Default for auto-adjust (Light for Dark Background Header, Dark for Light Background).
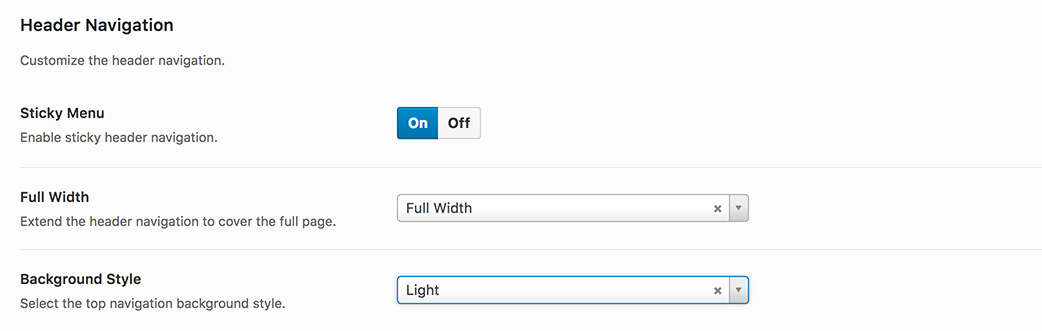
If you are using the 1st and 2nd option of the navigation layout (Top Navigation) so you can choose the header style between dark and light in Top Navigation section. This is a global setting, it will affect every page on your website.
- Navigate to Theme Options > Navigation > Header Navigation
-
In the Header Navigation section, choose Dark or Light for the Background Style option.
Pages
Create a New Page
-
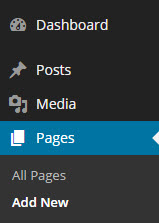
Navigate to Pages and click Add New.
-
Enter a page title.
-
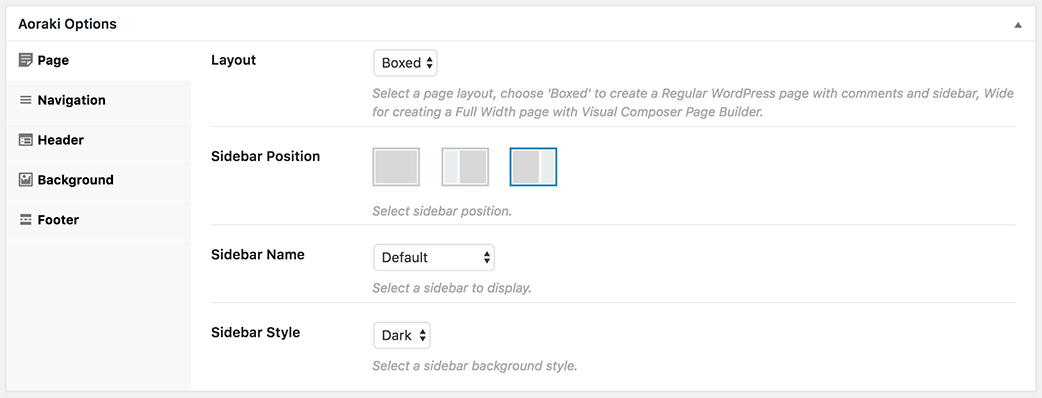
Select a page Layout from dropdown list in the Page tab.
Select Wide for creating a Full Width page with the WPBakery Page Builder Page Builder.
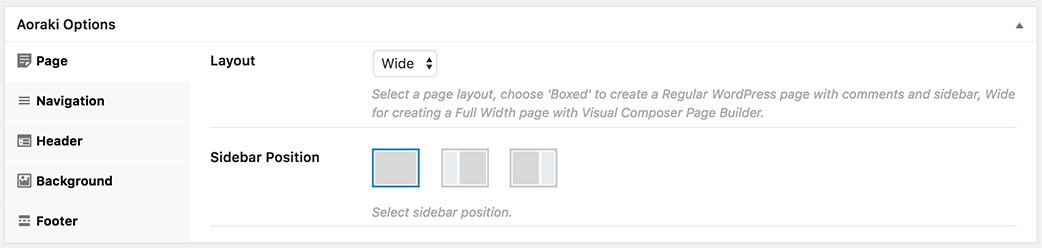
Or select Boxed to create a regular WordPress page with sidebar or comments box.
Show or hide the Discussion box in Screen Options.
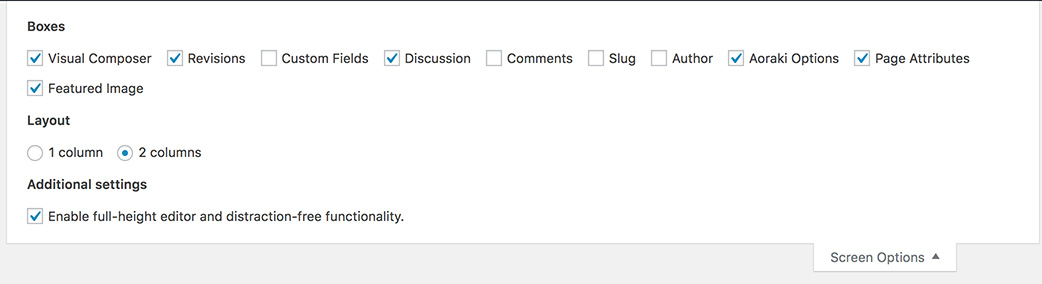
You will see the Discussion box at the bottom of the page.

Check or Uncheck the Allow comments option to show or hide the comments box on the page. You can disable the comments box for all pages in Theme Options.
- You can select any number of Options in the Page Options box.
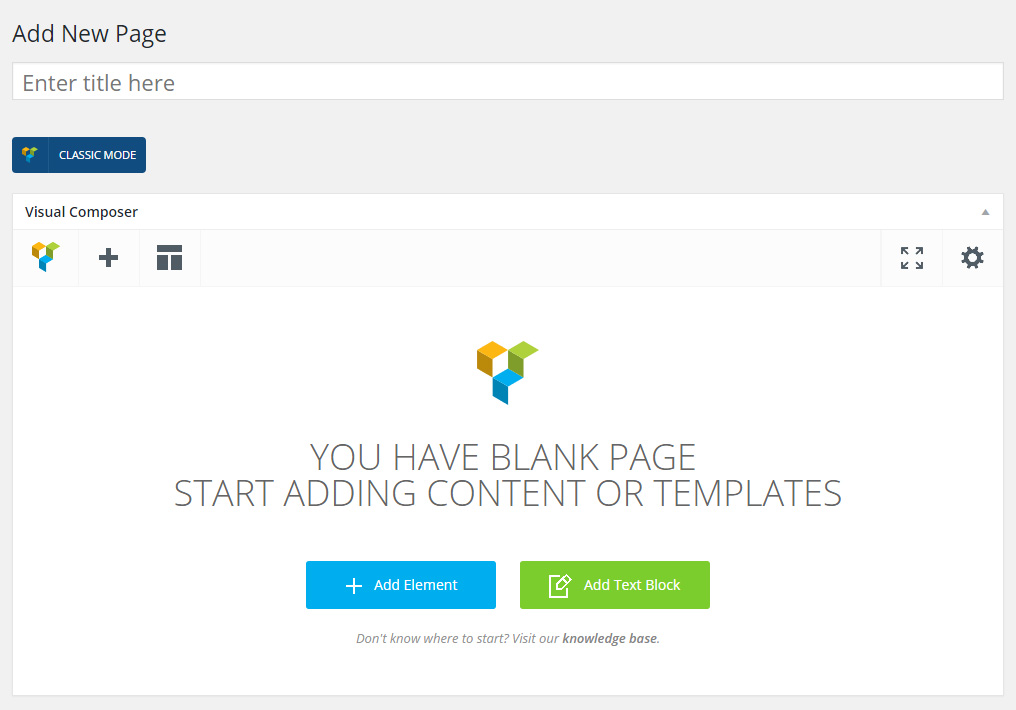
- Use the WPBakery Page Builder or HTML editor to build your page content. You can also use our demo content, see Import Demo Content.
Page Options
Aoraki's Options make it easy to customize your content for each page. There are several different sections included in the Aoraki Options box, each with its own title and purpose.
You can set sidebar position, apply slider, customize page title area, create a video background or parallax image background, etc. Each option has a description of what it will do.
Layout Options
Choose the page layout, page comments and sidebar options.
Choose the page header options.
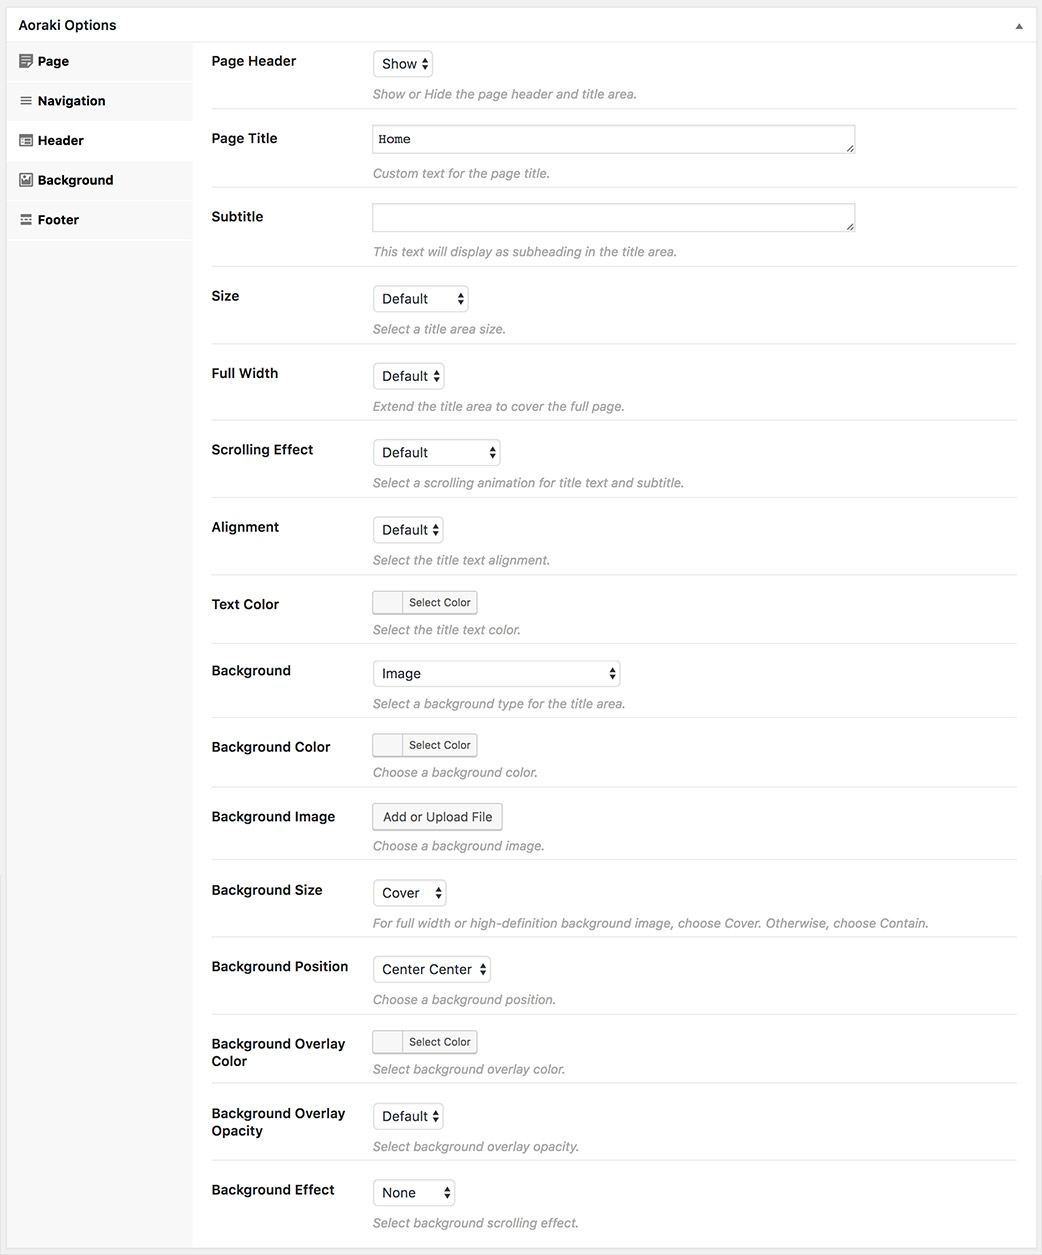
Header Options
Customize the page header. Choose to display or hide Page Header, select background type: Background Color, Background Image, Background Video or choose None for apply no background.
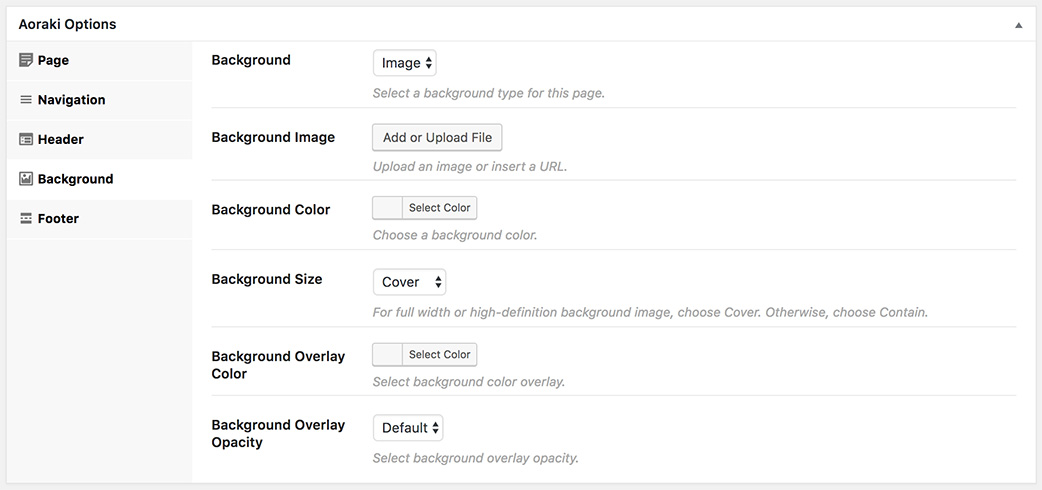
Background Options
Customize the page background. Choose to display or hide page background, select background type: Background Color, Background Image or choose None for apply no background.
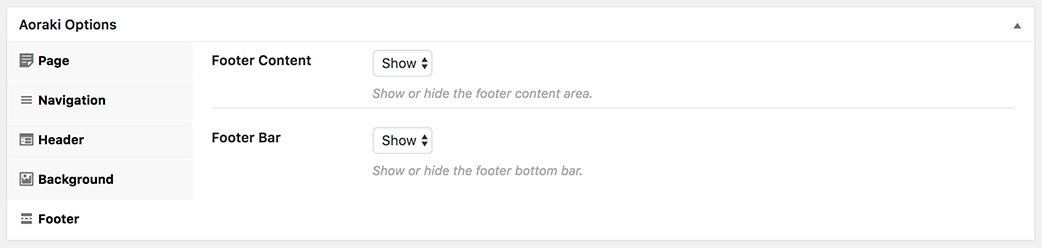
Choose to display or hide footer.
Create A One Page
Our One Page option allows you to create a one page site from existing pages.
First, you need to create your pages like Home, About Us, Our Services, Contact Us, etc. See also Create a New Page.
Next, setting up a one page website. Please see below for steps on how to do this.
Setting Up One Page Site
- Navigate to Theme Options and click "Page" tab.
-
Turn on "One Page Website" option
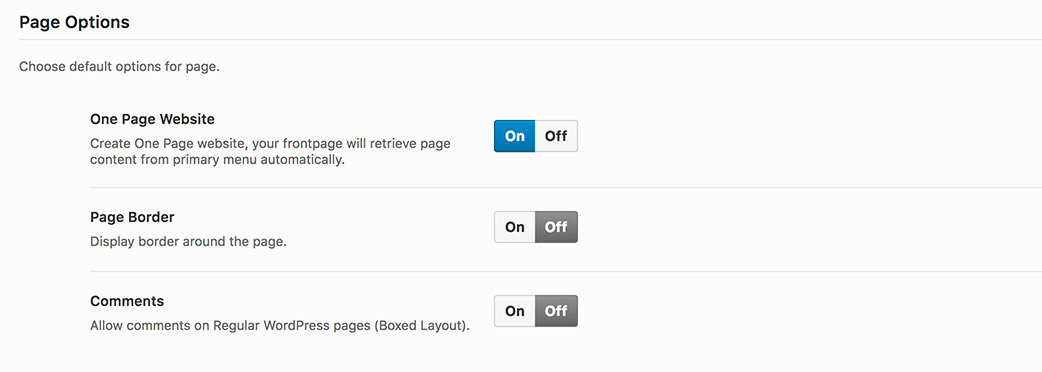
- Click "Save changes" button.
Please Note: Your "Home" page will automatically retreive page content from all pages at the first level in the primary menu, please see below for steps on how to set up your home page. To create the primary menu, see Setting up the Menu.
Setting Up Home Page
- Navigate to Settings > Reading.
-
Select “A Static Page” option.
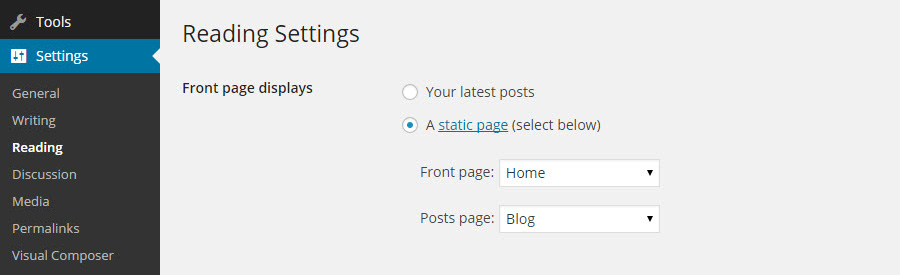
- Select your home page for the Front Page.
Blog
Create A Blog Page
See also Create a New Page.
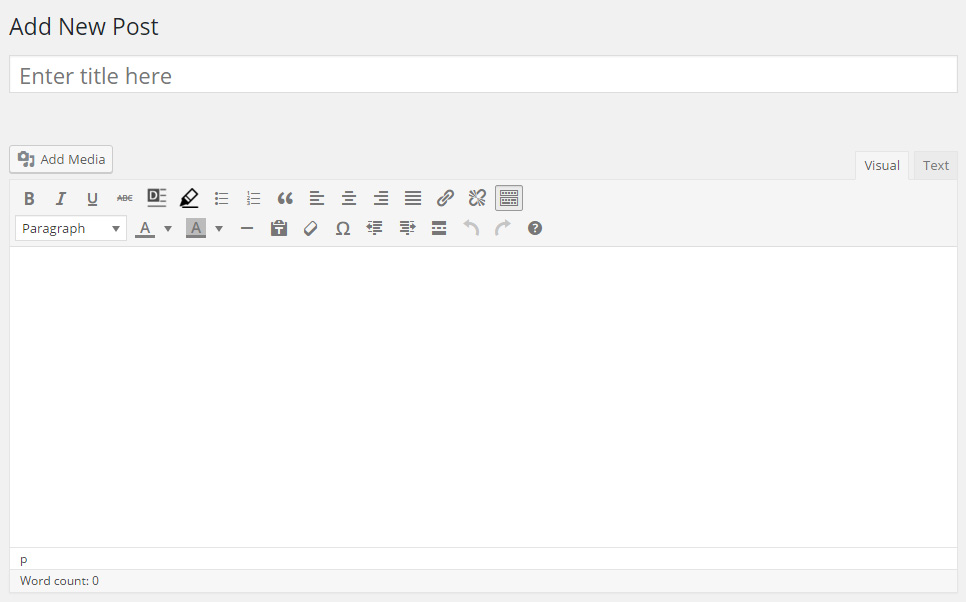
- Go to Pages and click Add New for create your blog page.
- Input a name for your blog page. You don't need to add any content in this page. WordPress will populate your blog posts automatically.
-
Select the page layout.
- You can change a Sidebar Position and any options in the Page Options box.
- Click "Publish" button to save the page.
- Navigate to Settings > Reading.
-
Select “A Static Page” option.
- Select your Blog page for the Posts page.
- Select a Blog Layout and Blog Options for the Posts page in Theme Options -> Blog.
Create A Blog Post
-
Navigate to Posts in your WordPress admin.

- Click on "Add New" button to make a new post.
-
Enter a post title.
- Select a post format from the right side.
- Insert your post content in the HTML editor field. You can also use WPBakery Page Builder to build your post content.
-
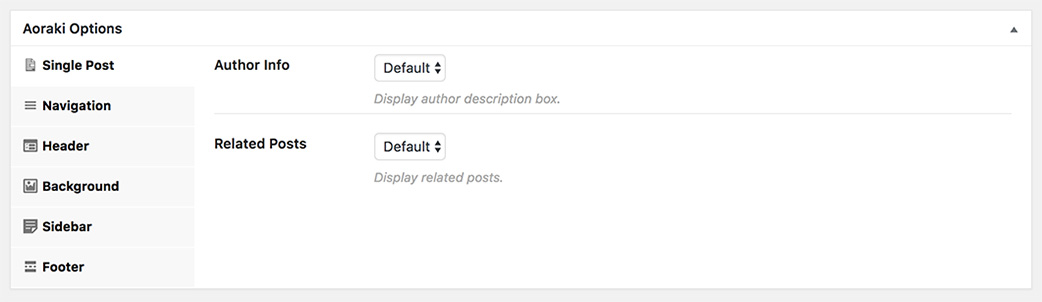
Choose any options in the Aoraki Options -> Single Post tab.
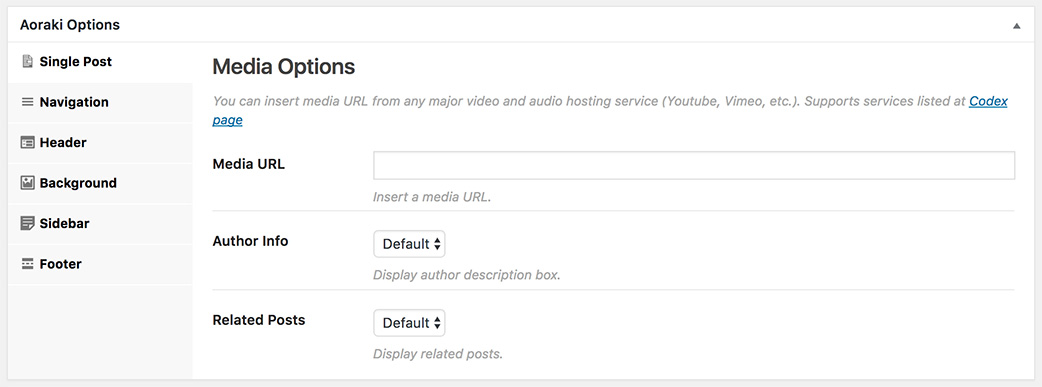
- For the Video and Audio post format, paste the URL into Media URL field in the Media Embed Options box.
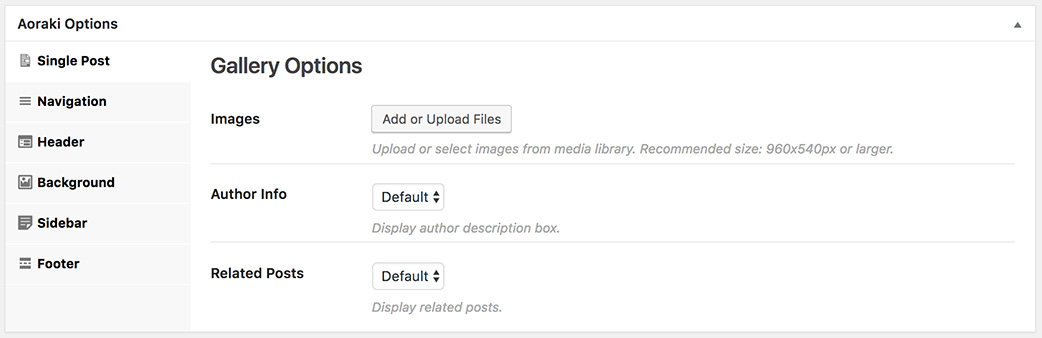
- For the Gallery post format, in Gallery Options box click "Add or Upload File" button to upload new images or select from Media Library.
- For the Link post format, paste the URL into Post URL field in the Link Options box.
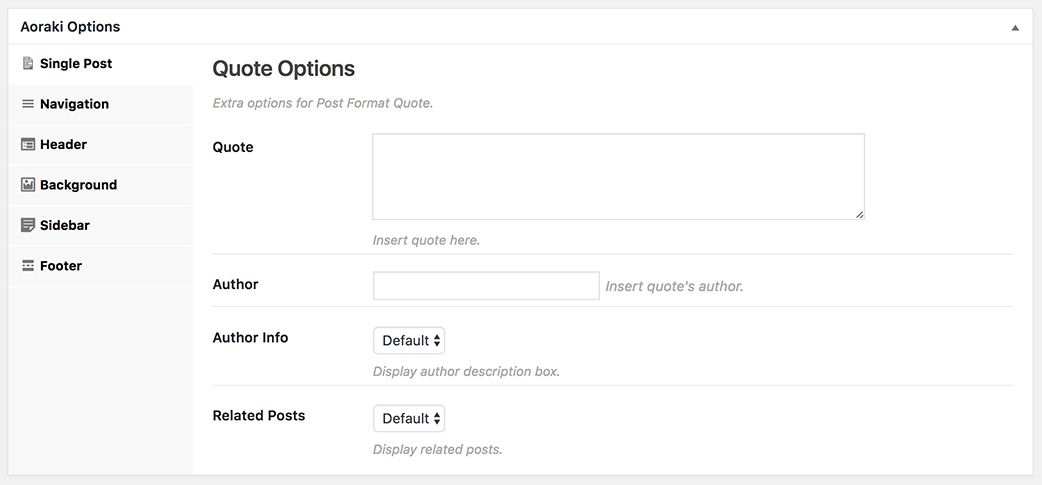
- For the Quote post format, enter the Quote and Author in Quote Options box.
- You can set the sidebar position for this post in Sidebar Options box.
- Add Categories from the right side. To assign it to the post, check the box next to the Category name.
- Add Tags from the right side. Type the name of the tag in the field, separate multiple tags with commas.
- To set the post featured image, click “Set Featured Image” and upload a new image or select your existing image from Media Library.
- Once you are finished, click Publish to save the post.
Blog Post Options
Aoraki includes several post options for you to use for each blog post. These options allow you to set different settings for each individual post.
Below are screenshots of each different section included in the Post Options box for each blog post.
Post Options
Post Gallery Options
Post Media Embed Options
Post Link Options

Post Quote Options

Portfolio
Aoraki includes portfolio template and options. Each portfolio page you create can have a different set of categories, options, layouts and more.
Create A Portfolio Page
See also Create a New Page.
- Navigate to Pages and click Add New.
- Input a page title.
-
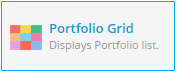
Add a Portfolio Grid to your page by using the WPBakery Page Builder. Choose any options in Settings window.
- You can select any number of page options in the Page Options box to customize your portfolio page.
- Click "Publish" button.
Create A Portfolio Post
-
Navigate to Portfolio in your WordPress admin.
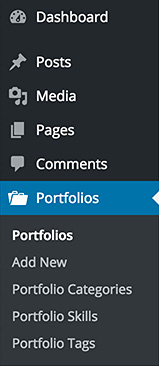
-
Click on "Add New" button. Input a title.
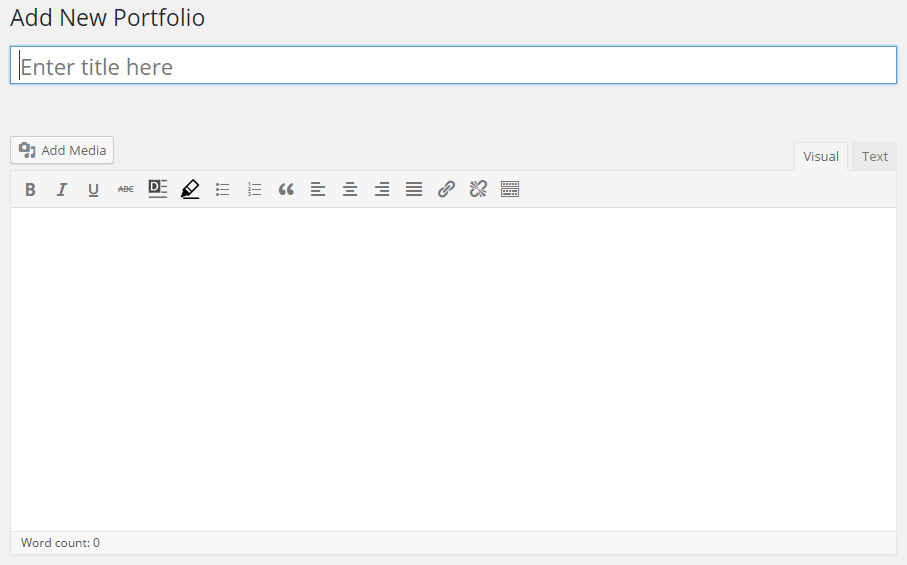
- Insert your post content in the HTML Editor field. You can use WPBakery Page Builder to build your content.
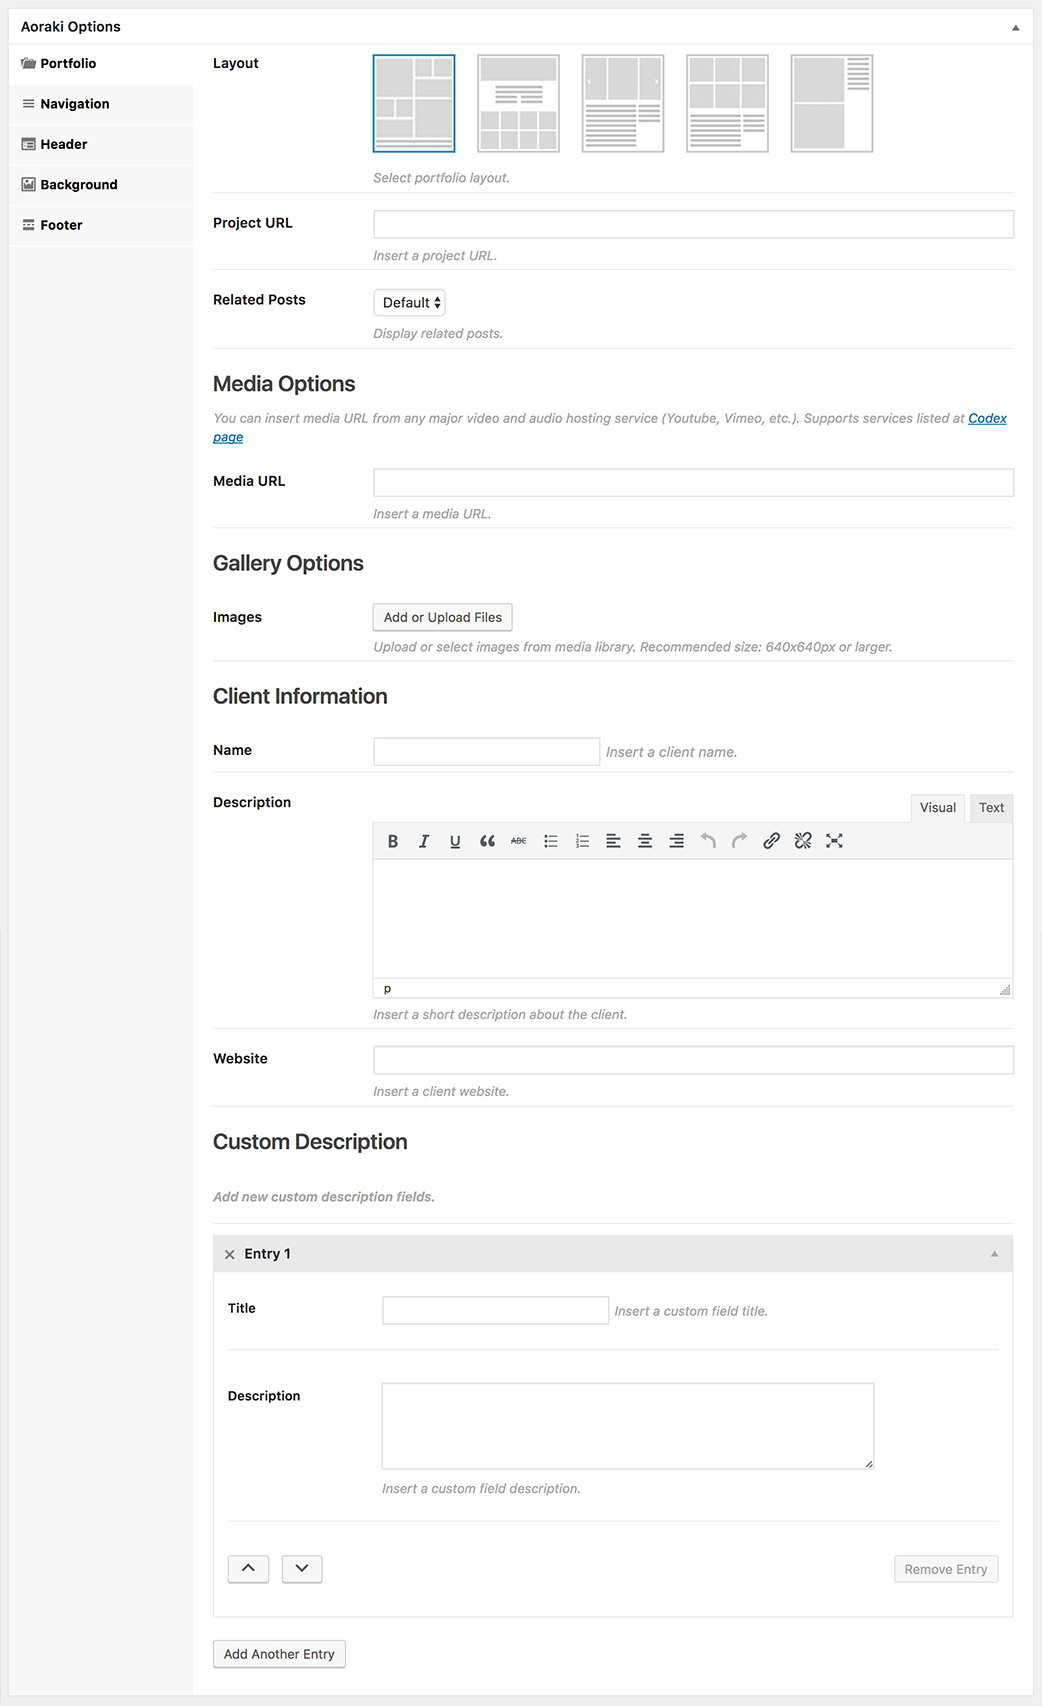
- You can select any number of portfolio options in the Portfolio Options box to customize your portfolio post.
- Add Skills from the right side. Click Add New, type in your skill text and hit enter. To assign it to the post, check the box next to the Skill name.
- Add Categories from the right side. To assign it to the post, check the box next to the Category name.
- Add Tags from the right side. Type the name of the tag in the field, separate multiple tags with commas.
- Once you are finished, click Publish to save the post.
Portfolio Options
Child Theme
If you would like to modify the theme. The Child Theme is the recommended way of modifying an existing theme.
This theme comes with a child theme called "Aoraki Child", see Package Content.
Why use a Child Theme?
- If you modify a theme directly and it is updated, then your modifications may be lost.
By using a child theme you will ensure that your modifications are preserved.
- Using a child theme can speed up development time.
- Using a child theme is a great way to learn about WordPress theme development.
To install the Child Theme, please follow the below steps:
- Navigate to Appearance > Themes.
- Click "Add New" button and hit the "Upload Theme" button.
- Click on "Choose File" and find the “aoraki-child-theme.zip” file from your computer and click “Install Now” button.
- The theme will be uploaded and installed.
- And then activate it.
- Like any themes, you can also install the child theme via cPanel File Manager and FTP. See Theme Installation.
See more details about Child Theme here: Child Themes
Modification
Please Note: The theme customization and modification are not included in the item support as stated on the Item Support Policy
You will need to do it on your own and here's the guide on how to customize and modify the theme via a child theme.
Please make sure you have a child theme installed and activated. See Child Theme.
To modify the functionality and styling of the theme.
- Navigate to Appearance > Editor.
- Select the Aoraki Child theme to edit.
- Add custom CSS into Stylesheet (style.css) to override the styling of the theme.
- Add custom functions and WordPress filters into Theme Functions (functions.php) to override the functionality of WordPress and the theme.
To modify the template files of the theme.
- Open FTP or cPanel File Manager.
- Copy the template file from the theme folder "wp-content/themes/aoraki/".
- Paste it in your child theme folder "wp-content/themes/aoraki-child-theme/". For instance, if you copy the template file from "wp-content/themes/aoraki/templates/post/single.php". You have to paste it inside "wp-content/themes/aoraki-child-theme/templates/post/single.php".
- Edit this file in your child theme so it will override the template from the theme.
See default WordPress template files here: Template Files List
Translation
Translating The Theme
All static words in the theme are available in the POT file that’s ready for translation.
After you extract the Aoraki theme file "aoraki.zip" you will see the file "aoraki.pot" in "aoraki/languages/".
Translate the theme by using POEdit
- Please make sure you have a child theme installed and activated. See Child Theme.
- Open POEdit, then choose File -> New from POT/PO files.
- Choose "aoraki.pot" from "aoraki/languages/aoraki.pot".
- Find the word, then edit/translate it.
- Save it in your current language code such as "de_DE.po", then you will also automatically get "de_DE.mo".
- Upload both PO and MO files to your child theme folder "wp-content/themes/aoraki-child-theme/languages/" on your web server.
See more on how to translate WordPress theme on WordPress Theme Handbook
Translate the theme by using Loco Translate plugin
You can translate the theme from your WordPress admin page by using the Loco Translate plugin.
- Go to Plugins -> Add New to install new plugin.
- Find the plugin by typing the plugin name (Loco Translate), then click on "Install Now" to install it.
- Click on the Activate Plugin link to activate the plugin.
You can find more details on how to setup and use this plugin on the plugin's Official Page.
WPBakery Page Builder
Aoraki includes a license of WPBakery Page Builder by WPBakery.
You can normally use this plugin without registering a purchase code.
Also, if there is a notification message for activating/registering a purchased product, you can ignore it.
Please note: This theme is not compatible with Front-end Editor so it was disabled by default. Please use the Back-end Editor instead.
With the most popular Drag & Drop Page Builder and custom add-ons content elements. You can build any responsive pages without coding!
Build Page & Content
- Click on "Backend Editor" button to build your content in WordPress dashboard page.
-
You will see the WPBakery Page Builder blank page.
-
Click "Add element" button to add new content element.
Select a content element you want to insert into your page or post.

- Select any Page Options or Post Options for your page or post.
Section Options
Aoraki includes several section options for decorate your page layout. Edit row settings to customize the page section.
Row
Rows are used to divide your page into the logic blocks with columns, columns later will hold your content blocks. Rows can be divided into the layouts (eg. 1/2 + 1/2, 1/3 + 1/3 + 1/3, and so on). Your page can have unlimited number of rows. To change row's position, click and drag row's drag handler (top left row's corner) and drag row around (vertical axis).

Full Width Section
To create a Full Width section. Select the "Full Width" for Content Width option in General tab.

Overlap Options
This theme comes with Overlap feature that allows you to create an overlap content. This feature is included in both Section and Column.
Create an Overlap Section
-
Edit the row, select an Overlap direction so this element will overlap with another element in the selected direction.
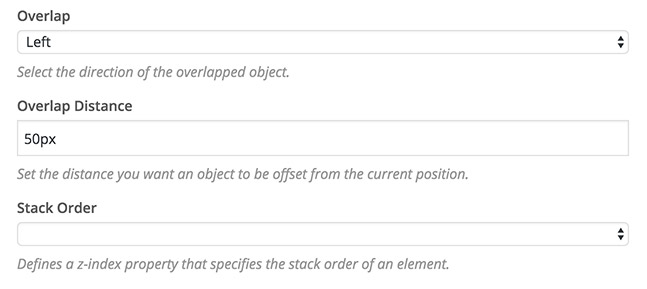
- Set the distance you want an object to be offset from the current position.
- Choose the stack order.
Create an Overlap Column
Edit the column, choose the Overlap direction and any options of Overlap feature like the Overlap Section above.
However, the column is in the row. If you'd like to create the overlap content between columns in the different rows, you must also enable Overlap feature for the row container and set the Stack Order to ensure the row and its columns will be in front of another row.
Follow the step below to enable Overlap feature for the row container:
- Edit the row container of this column.
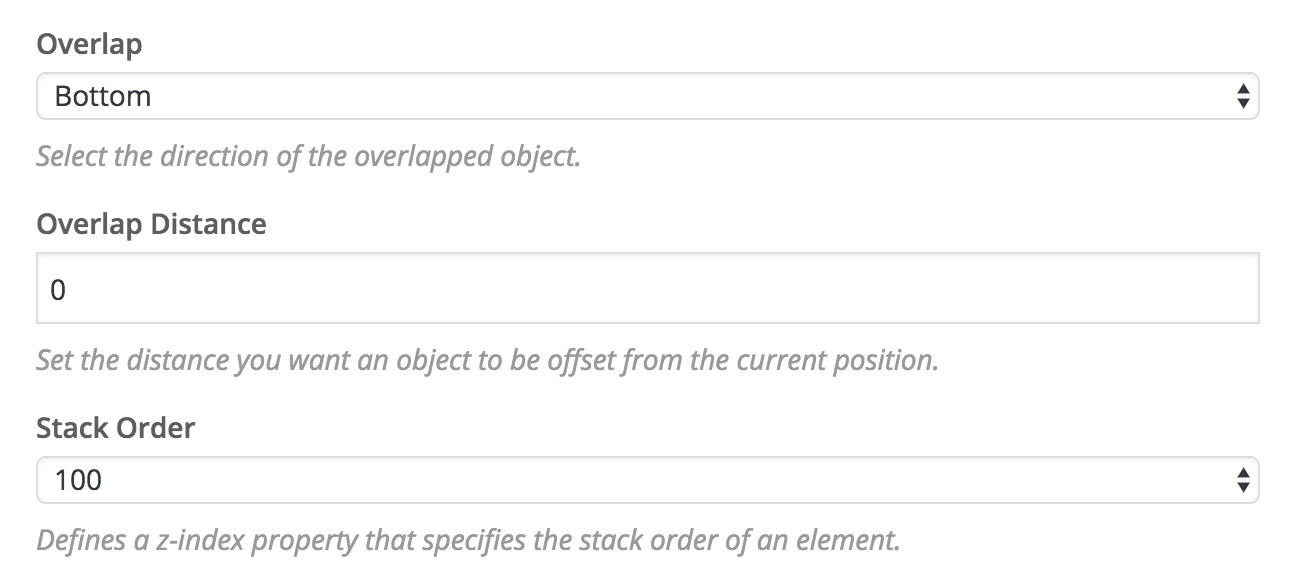
- Choose the overlap direction.
- Set the Overlap Distance to 0.
-
Set the Stack Order to 100 or greater.
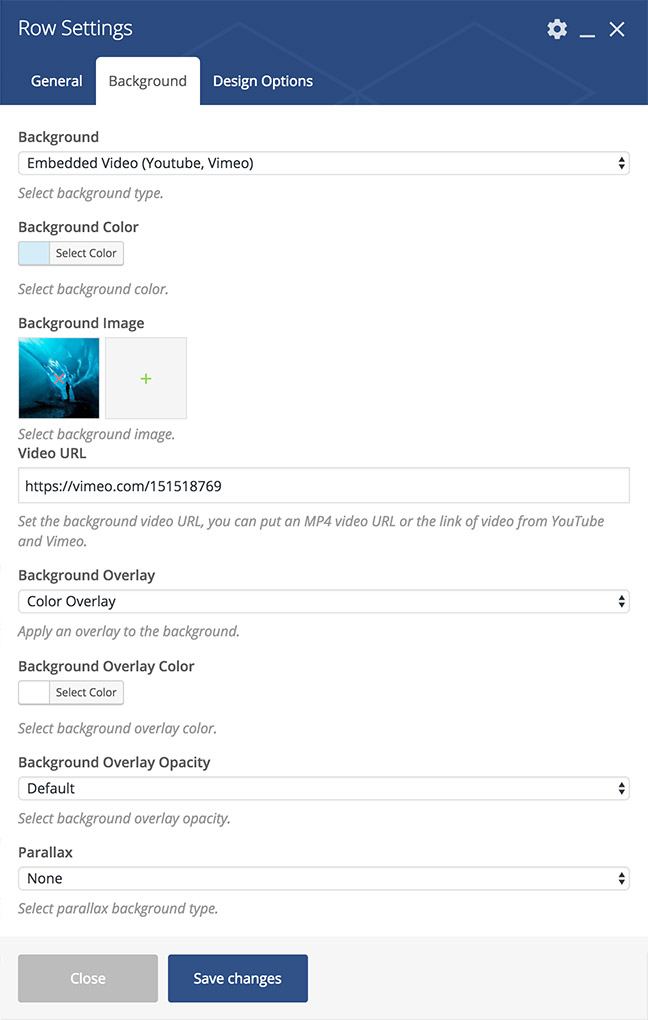
Background Options
Image Background
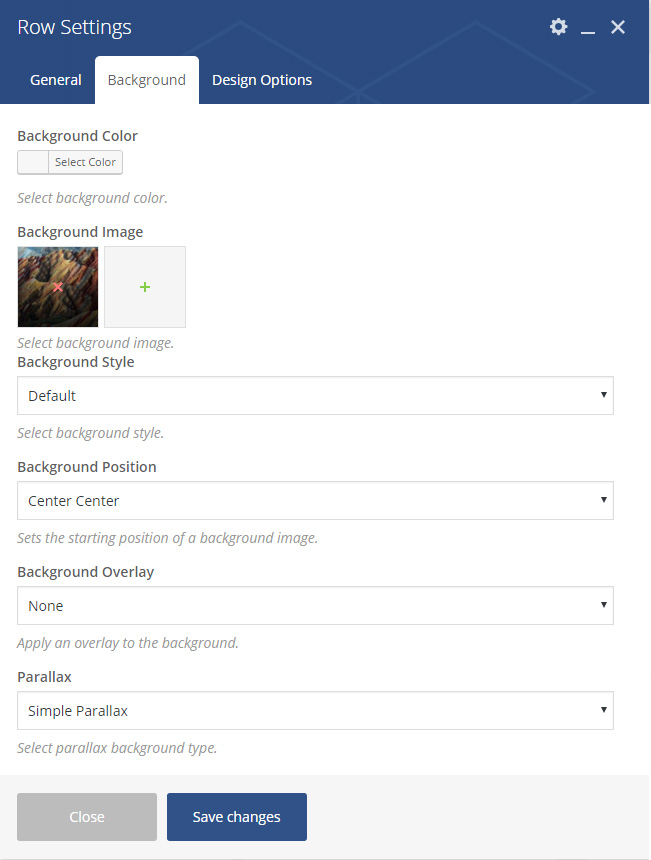
Video Background
Parallax Background
-
Add a Background Image.

-
Select a Parallax option.

Background Overlay Color
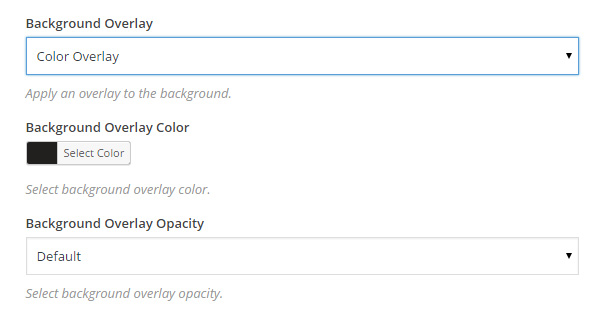
- Select Color Overlay for Background Overlay option.
- Select background color and overlay opacity. Default value: 0.8.
WPBakery Page Builder Settings
You can find WPBakery Page Builder settings in WordPress dashboard, WPBakery Page Builder -> General Settings.
You can enable WPBakery Page Builder to build your post and portfolio post by choosing Post types in Role Manager tab as below

For more information about WPBakery Page Builder. See the link below.
Slider Revolution
Aoraki includes a license of Slider Revolution by ThemePunch.
You can normally use this plugin without registering a purchase code.
Also, if there is a notification message for activating/registering a purchased product, you can ignore it.
Revolution Slider Online Documentation.
You can see an Offline Documentation in Package Content.
For more information about Slider Revolution. See the links below.